
You can read Obsidian notes aloud locally by connecting the Narrate plugin to OpenVox. Start OpenVox’s local speech server, enter its base URL in Narrate, fetch a model and voice, and play a Markdown note. The Narrate directory listing explicitly names OpenVox as a recommended server.
This is useful when your vault already contains the material you want to hear: research notes, a draft article, a study summary, or a weekly review. Listening gives you another way to revisit that work without copying every note into a separate reading app.
Your note-to-audio workflow
Obsidian Markdown → Narrate → OpenVox local API → spoken audio
Run both desktop apps on the same computer. Narrate prepares the reading; OpenVox generates the voice.
What you need before connecting Obsidian and OpenVox
- Desktop Obsidian with a vault containing a Markdown note.
- Narrate installed and enabled in that vault.
- OpenVox running with a downloaded TTS model and its local API started.
- A compatible model, language, and voice selected from your own server’s lists.
Narrate’s current manifest marks it as desktop-only and specifies Obsidian 1.4.4 or newer. This guide focuses on a Mac, the platform highlighted by the plugin documentation. The same base-URL workflow can be used with OpenVox for Windows when its local API supplies the required routes.
Download model files before an offline session. Your voice generation can then run locally, while the first installation and model downloads need an internet connection.
Step 1: install the Narrate plugin in Obsidian
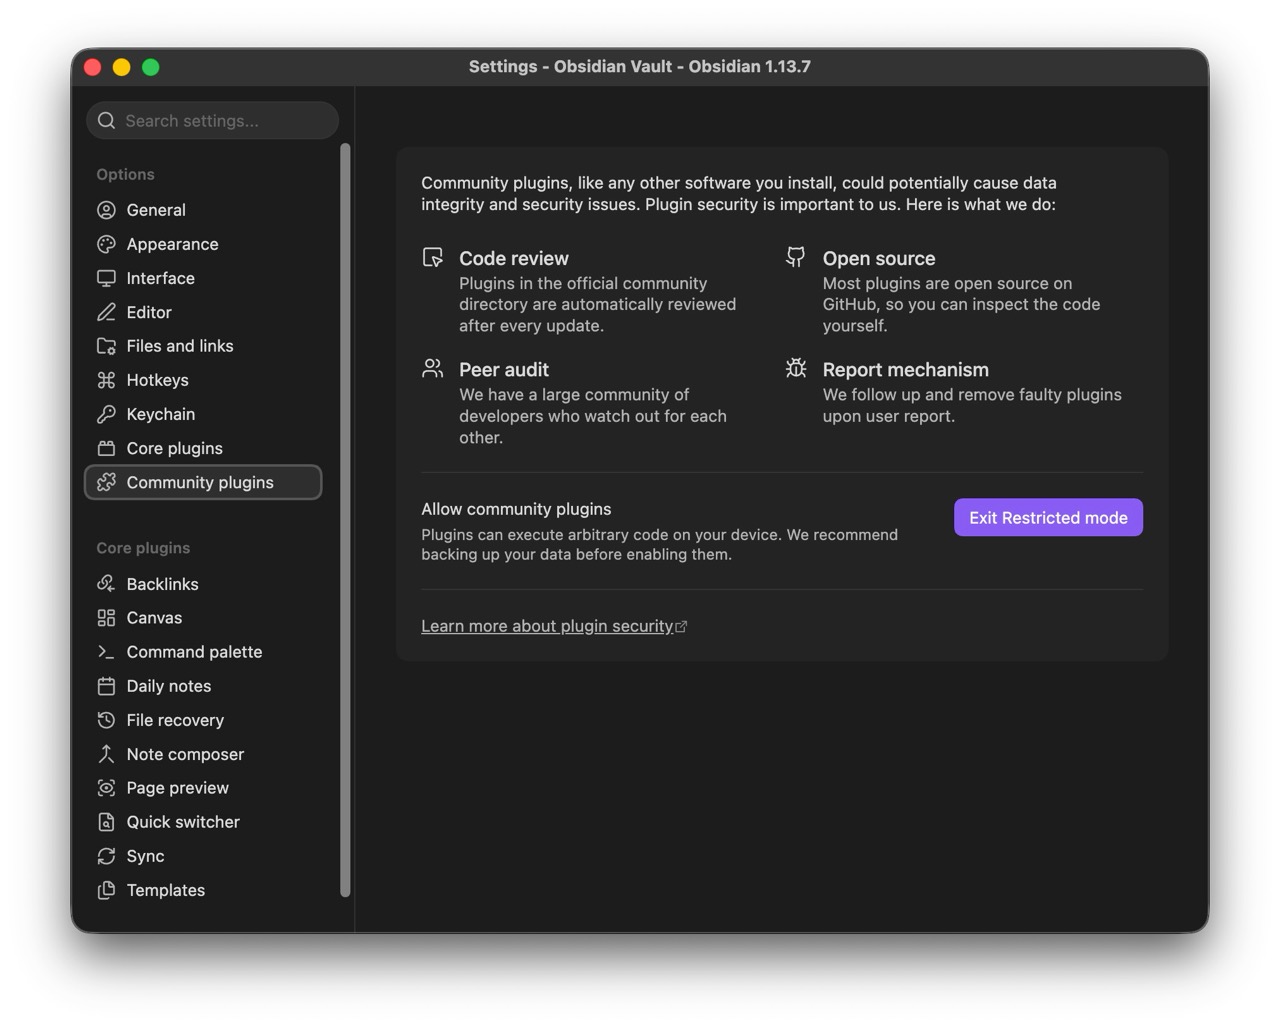
Start in the vault where you want to listen to notes. Open Obsidian’s Settings using the gear icon at the bottom left, or press Cmd + , on Mac. Select Community plugins in the left sidebar.
1.1. Exit Restricted mode
If community plugins are disabled, click the purple Exit Restricted mode button. Obsidian then displays the community plugin controls. If those controls are already visible, continue to Browse.
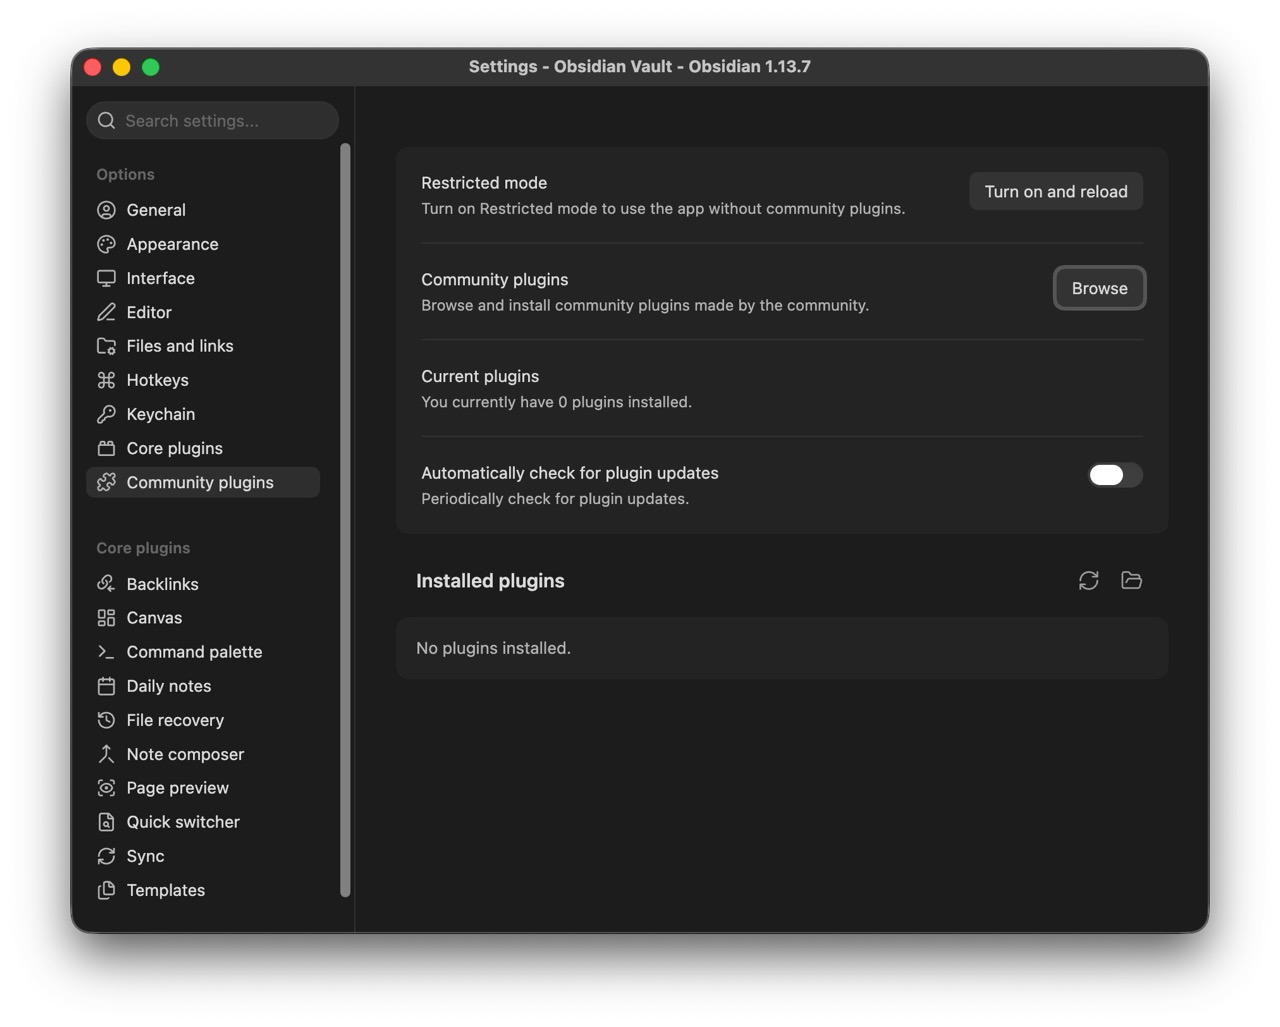
1.2. Open the community plugin browser
Click Browse next to the Community plugins section. The Turn on and reload button above it turns Restricted mode back on; use Browse to find Narrate.
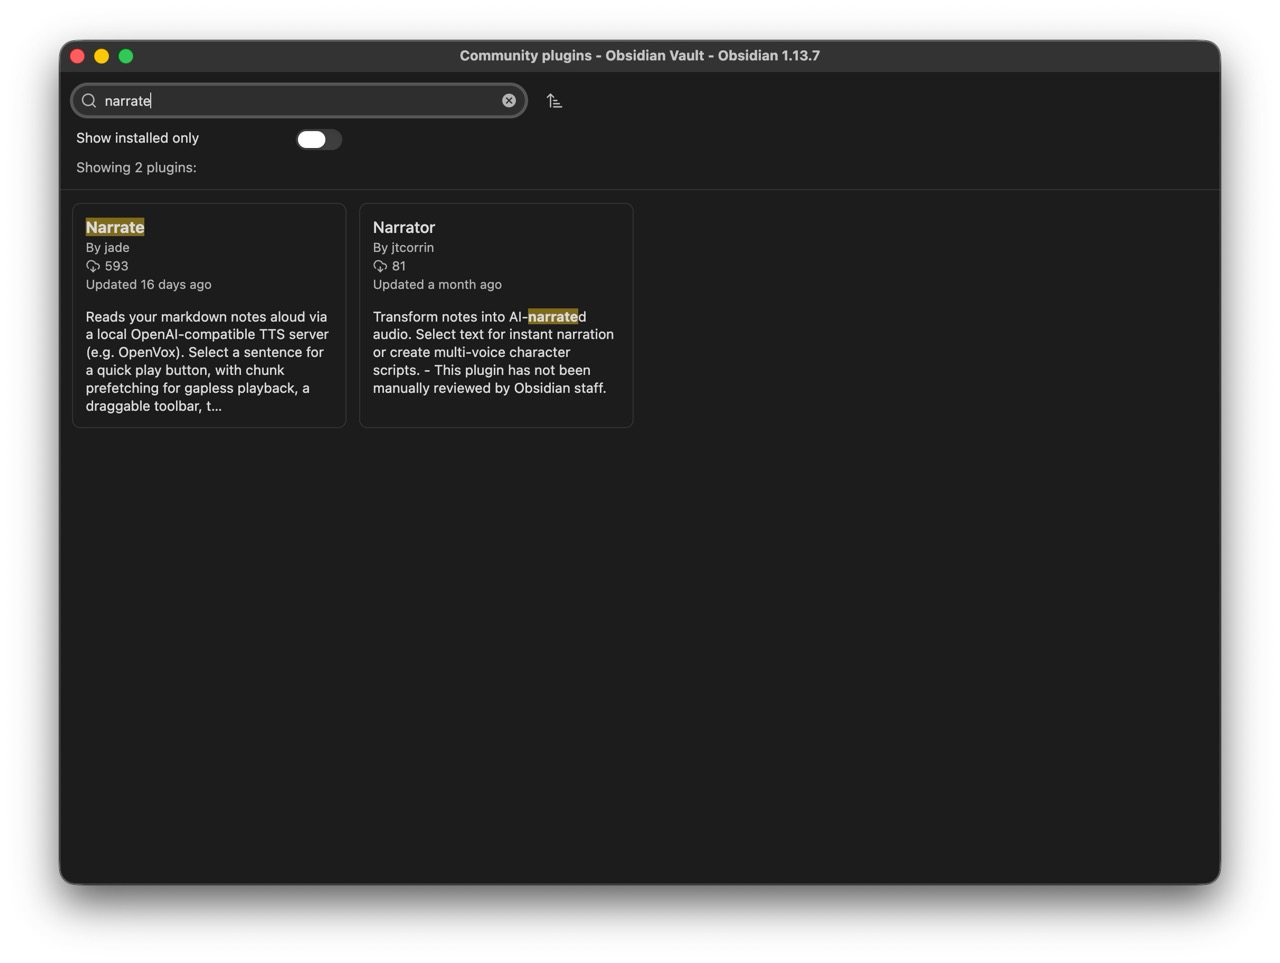
1.3. Search for Narrate by jade
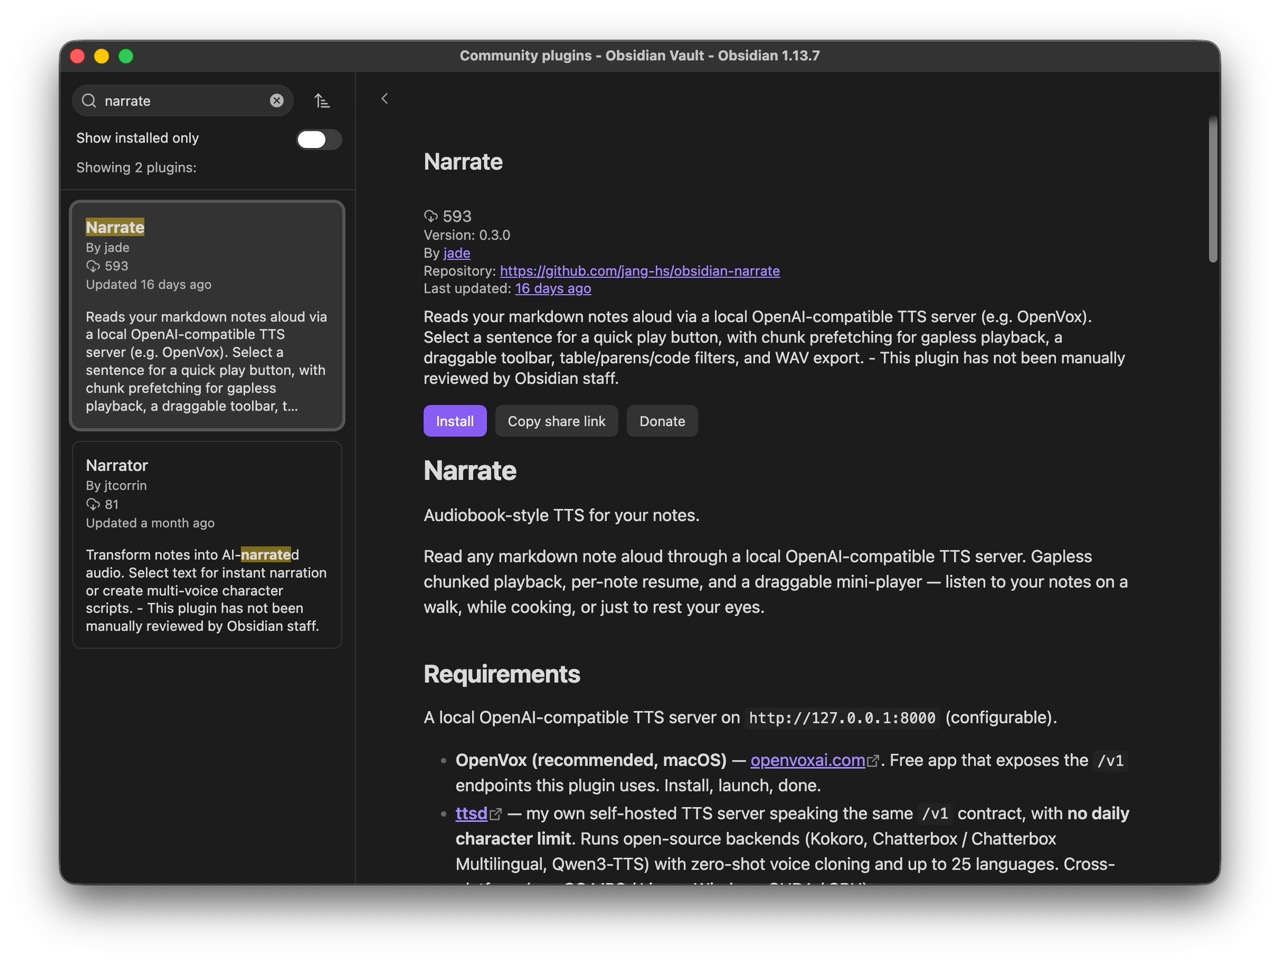
Enter narrate in the search field. In the pictured results, choose Narrate by jade, whose description mentions a local OpenAI-compatible TTS server and OpenVox. A similarly named Narrator plugin also appears, so check the exact name.
1.4. Install, then enable Narrate
Open Narrate’s detail panel and confirm its repository is jang-hs/obsidian-narrate. Click Install and wait for the download to finish. The screenshots show Narrate version 0.3.0; your store may offer a newer release.
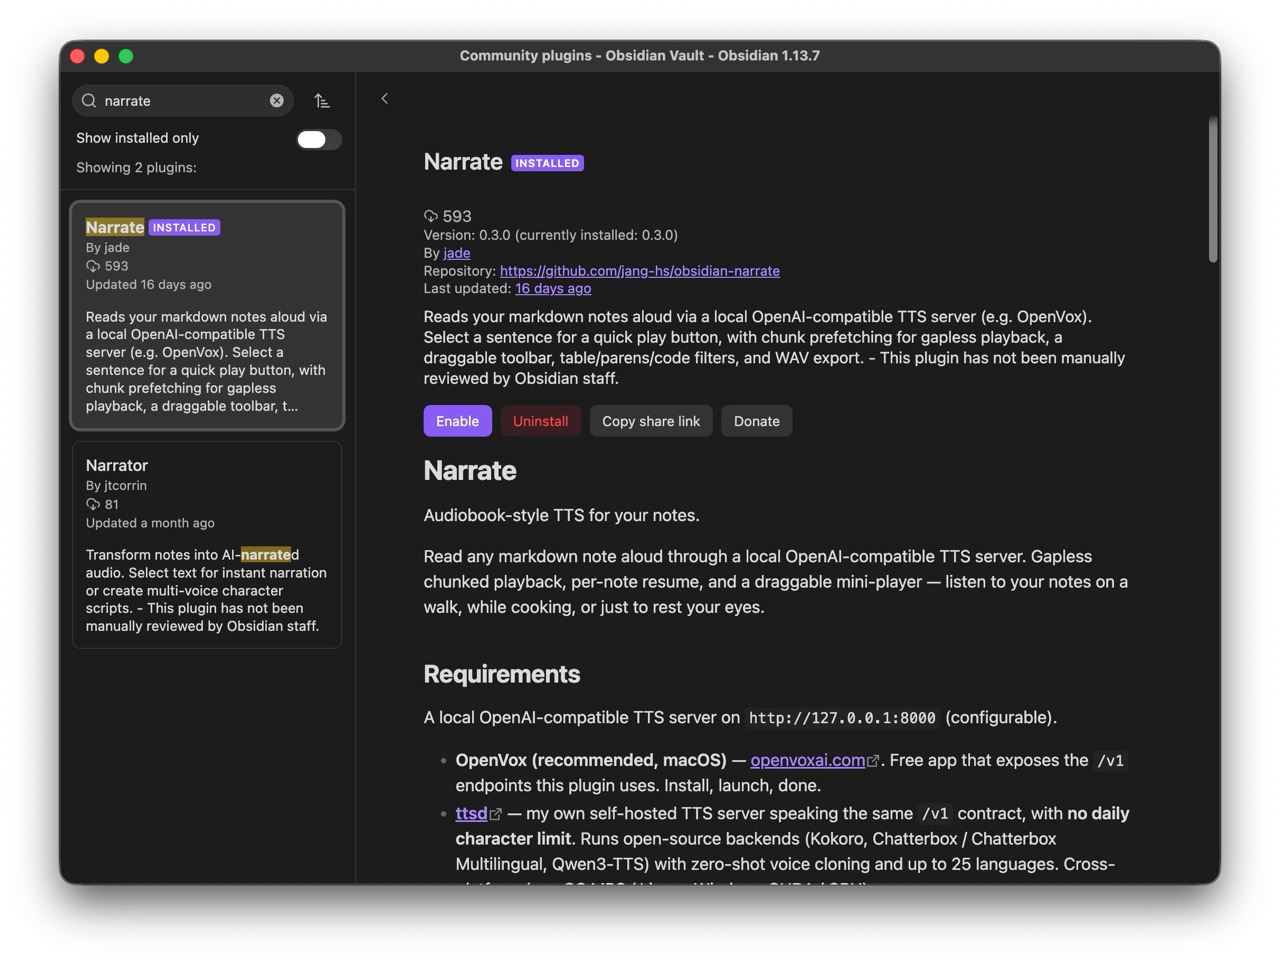
When the plugin displays the Installed badge, click Enable. Installation and activation are separate steps. Close the plugin browser and look for Narrate under Community plugins in the Settings sidebar; scroll down if needed.
For a quick checklist:
- Open Settings → Community plugins in Obsidian.
- Turn on community plugins if they are disabled, then select Browse.
- Search for Narrate by jade and confirm the repository is
jang-hs/obsidian-narrate. - Select Install, then Enable.
These follow Obsidian’s installation instructions. Narrate also appears in the official plugin registry.
If Narrate does not appear in your plugin browser
The author also documents a manual installation: obtain main.js, manifest.json, and styles.css from the published plugin release, put them in <vault>/.obsidian/plugins/narrate/, then reload community plugins and enable Narrate. Follow the author’s installation notes for the version you install.
Step 2: start the local API in OpenVox
- Launch OpenVox and open Manage Models.
- Download a TTS model. The Narrate settings screenshot below uses Supertonic 3. You can also start with Kokoro for a ready-made voice or choose OmniVoice for broader language coverage.
- Open Local API + MCP and start the server if it is stopped.
- Copy the displayed Base URL, including its port and
/v1.
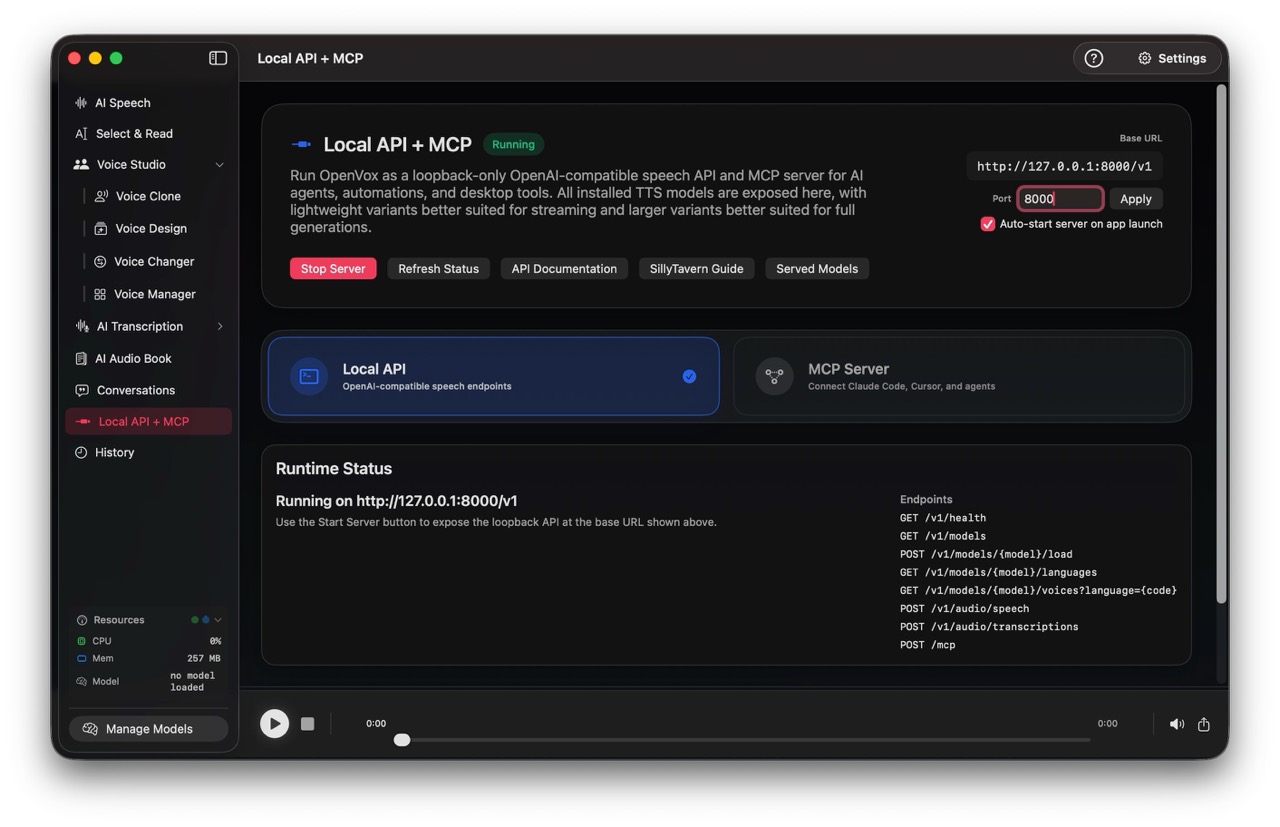
In this screenshot, the green Running badge and Stop Server button mean the server is already started. Check that Runtime Status shows http://127.0.0.1:8000/v1 and copy that same Base URL from the top right.
If another app occupies port 8000, enter a free port in OpenVox, click Apply, and use the resulting Base URL in Narrate. You can enable Auto-start server on app launch for later sessions. Keep OpenVox running while Narrate is generating audio.
Step 3: enter the API URL and fetch your voice
Return to Obsidian’s Settings and click Narrate in the Community plugins section near the bottom of the sidebar. Its settings panel has the heading Audiobook TTS.
3.1. Paste the base URL and test the connection
Replace the API URL with the exact Base URL from OpenVox. For the screenshots here, enter http://127.0.0.1:8000/v1, then click Test connection. A successful connection notice confirms Narrate can retrieve the model list.
3.2. Fetch and select the model, language, and voice in order
- Click Fetch on the Model row. Open that row’s dropdown and choose an installed model. The example uses
supertonic-3. - Click Fetch on the Language row after selecting the model. Choose
en — Englishfor an English note, or another returned language that matches your text. - Click Fetch on the Voice row after selecting the language. Choose an identifier returned by your own server; a long voice name may extend beyond the visible field.
- Check the text fields beside the dropdowns. They should reflect your chosen model ID, language code, and voice ID.
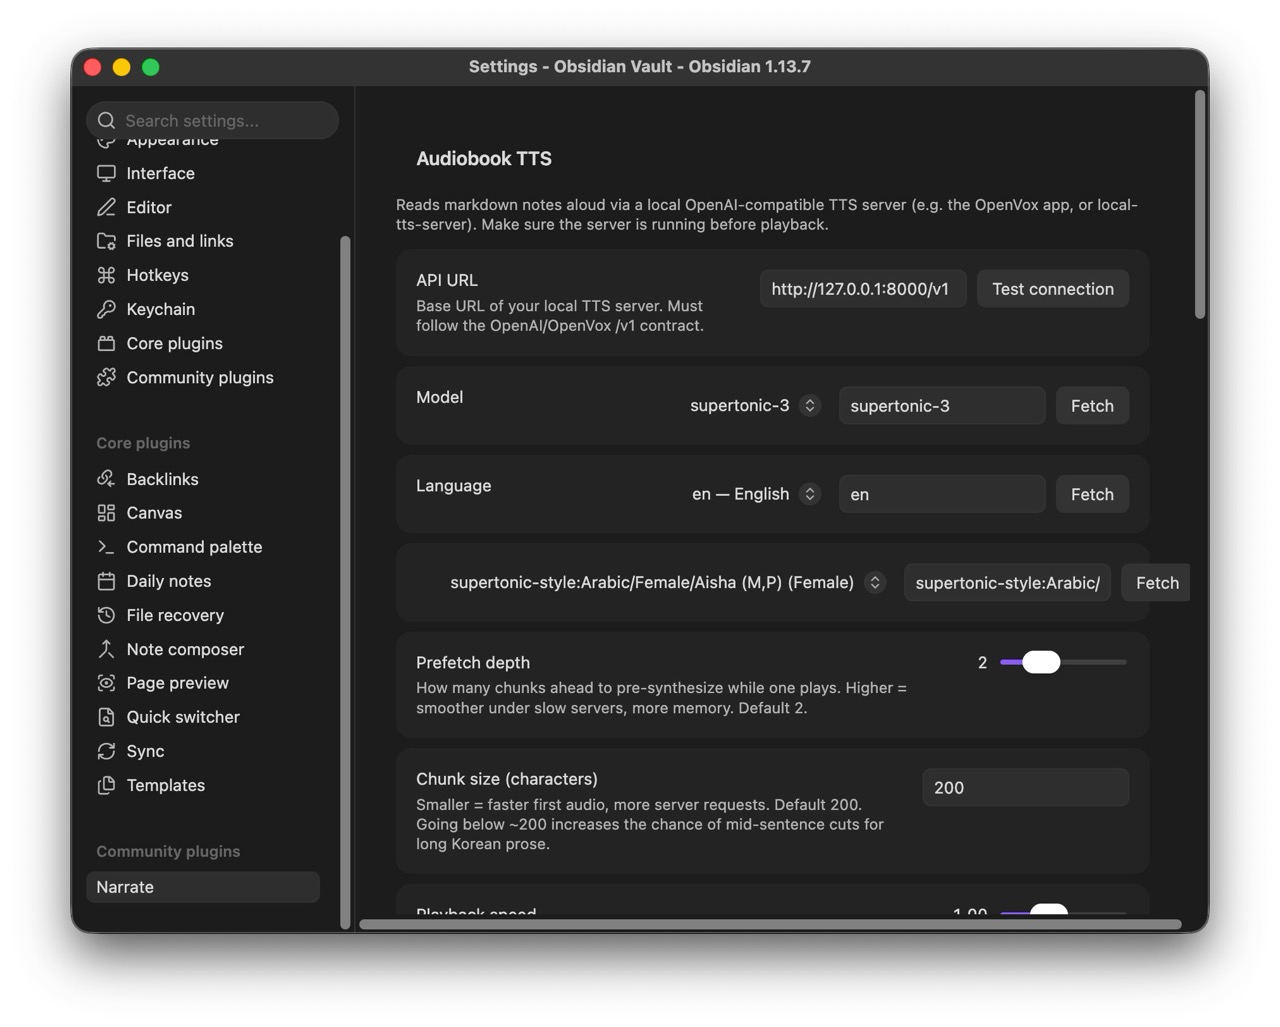
The connection settings at a glance:
| Field or button | What to enter or do |
|---|---|
| API URL | Paste the OpenVox base URL, for example http://127.0.0.1:8000/v1. |
| Test connection | Confirm Narrate can reach the server and retrieve models. |
| Model → Fetch | Choose the downloaded model from the returned list. |
| Language → Fetch | Select a supported language for that model. |
| Voice → Fetch | Select a voice returned for that model and language. |
Use the base URL ending in /v1. Narrate adds /models and /audio/speech itself. Entering the full speech endpoint in this field produces incorrect request paths.
The initial settings use OmniVoice with Korean language and voice values. Fetching a list does not necessarily replace the existing selection, so explicitly choose each value that fits your note. After switching models, fetch and choose the language and voice again.
For the first test, leave Prefetch depth at 2 and Chunk size (characters) at 200, as pictured. Begin with the normal playback speed; adjust the reading after you hear a successful sample.
No cloud OpenAI API key is needed for OpenVox’s local server. The exact field behavior is visible in Narrate’s settings implementation.
Step 4: read your first note aloud
4.1. Test a selection with the inline play button
- Close Settings and open a note in your vault, such as the Welcome note shown below.
- Drag across a short sentence to select it.
- Click the small triangular play button beside the selection. Its tooltip reads Read selection aloud.
- Wait for the first audio to be prepared, then listen for the voice and language you selected.
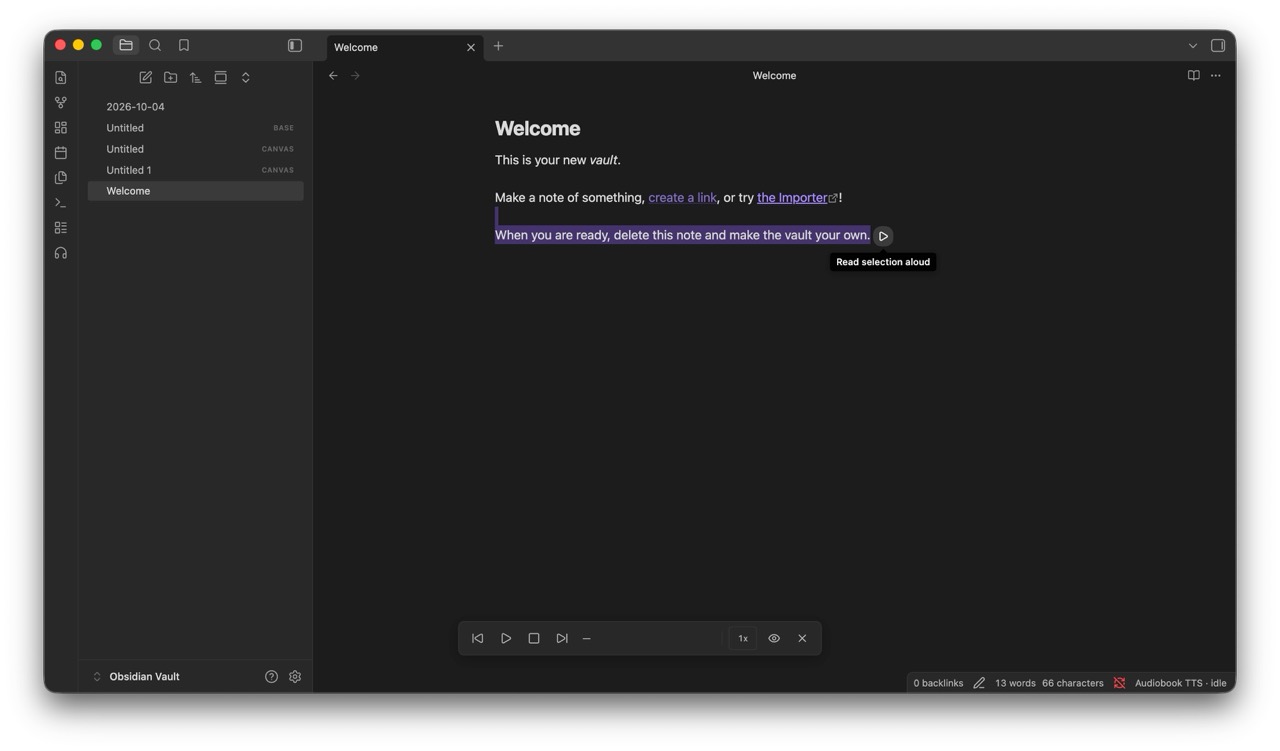
If the inline button is missing, first confirm Narrate is enabled, then turn on Show floating play button on selection in its settings. You can also right-click the selected text and choose Read selection aloud, or run that command from the command palette.
4.2. Read a whole note with the command palette
Create a short test note with ordinary prose before trying a long research document:
# Listening test

This note is being read by a local voice through OpenVox.

I am checking pronunciation and pauses before listening to a longer draft.
Open the command palette with Cmd + P on Mac or Ctrl + P on Windows. Run Read current note aloud. Give the first generation time to load the model, then use the playback toolbar to pause or move through the reading.
For a quick proofread, select a sentence and run Read selection aloud. Listening to one paragraph at a time makes repeated words, missing transitions, and awkward sentences easier to spot. Assign a convenient shortcut through Settings → Hotkeys once the connection works.
4.3. Control playback and add a shortcut
Use the toolbar’s play/pause and stop controls to manage the session, and its previous/next controls to move between chunks. The pictured 1x control changes playback speed. You can drag the mini-toolbar to a convenient position.
To add a keyboard shortcut, open Settings → Hotkeys, search for Narrate or the reading command’s name, and assign a key combination that does not conflict with your existing shortcuts. Start with Read selection aloud for frequent proofreading.
For the available commands and playback controls, see the Narrate feature list.
Make Markdown notes easier to listen to
Reading a vault aloud works best when a note can stand on its own. Expand unexplained abbreviations, give important sections clear headings, and introduce any table before its values. A brief summary at the top can help you remember what you are listening to.
Narrate prepares Markdown before speech. Its parser removes frontmatter, image embeds, and bare URLs; links keep their readable text. The settings let you skip code, control table reading, and include or omit parenthetical content. These rules are documented in the plugin README.
For a study note, try leaving explanatory parentheses in the reading. For a programming note, skip large code samples and add a prose explanation of what the code does. Preview one section before applying the same settings to a long document.
Use a cloned voice for your Obsidian notes
Create and save a permitted voice in OpenVox with a cloning-capable model. Then return to Narrate, select that model, choose the appropriate language, and fetch its voices. Pick the saved voice identifier returned by your server.
A saved voice must be available through the selected model’s API voice list. Typing a friendly display name into Narrate will not work if the server expects a different identifier. If the voice is missing, confirm it works in OpenVox and that you selected the matching model before fetching again.
Start with a clean recording of one speaker and a short note. See the OpenVox voice cloning guide for better reference recordings.
Export an Obsidian note as a WAV file
Use Narrate’s audio-generation command when you want a recording without listening through the whole note. Choose an Audio folder in the vault to keep exports together, such as audio-notes. An empty folder setting saves the WAV alongside the source note.
The plugin joins generated chunks into a single WAV named after the note, and an existing file at that output path can be overwritten. Copy an earlier version elsewhere if you want to retain both recordings. The export behavior is described in the author’s audio output documentation.
A desktop export is also a useful way to listen on your phone. Transfer the WAV using your usual file-sharing method and play it in an audio app. This does not require Narrate to run on mobile.
Improve playback and understand local privacy
Narrate generates sections of audio ahead of playback. If you hear gaps, try a modest increase to Prefetch depth and a lighter model. Prefetching helps when generation can keep up over time; it cannot make a slow model produce audio faster than the computer allows.
Optional disk caching can reuse previously generated audio. It also creates files inside your vault, so account for those files when choosing what to sync or back up. Keep caching off if you do not want persistent audio copies, or clear the cache through the plugin settings. The cache implementation stores WAV chunks in a vault-relative folder.
With the API URL set to 127.0.0.1 and both apps on the same machine, speech requests go to the local OpenVox server. Your vault’s sync provider, other plugins, and exported audio have their own data paths. Local TTS controls where synthesis happens; it does not change those separate settings.
Troubleshoot Narrate and OpenVox
| Symptom | What to check |
|---|---|
| Connection fails | Start the OpenVox server; compare the host, port, and /v1 base path with Narrate’s API URL. |
| Model or voice list is empty | Download the model, select it explicitly, then fetch and choose a language before fetching voices. |
| Wrong language or voice | Replace the initial Korean selections with entries returned by your own server. |
| First playback takes time | Allow the model to initialize. Compare a later run with the model already loaded. |
| Pauses between sections | Try a lighter model or adjust prefetching. Close other heavy generation workloads. |
| Busy server or 429 response | Let the active job finish, then retry a short note. Avoid launching another export at the same time. |
| Nothing is read | Test plain prose; your note may contain content excluded by the Markdown filters. |
| Narrate settings or commands are missing | Return to Community plugins and enable Narrate after installation. Scroll to its entry in the Settings sidebar. |
| Inline play button is missing | Select actual note text, confirm the selection play-button option is enabled, or use Read selection aloud from the command palette. |
To check the server separately from Obsidian, open this address in a browser, adjusting the port if needed:
http://127.0.0.1:8000/v1/modelsA model-list response confirms that the discovery route is reachable. It does not prove a particular model can synthesize audio; test a short generation in OpenVox next. For endpoint details, see the OpenVox local TTS API guide.
Frequently asked questions
How do I connect OpenVox to Obsidian?
Start OpenVox’s local API, enable Narrate in Obsidian, and set Narrate’s API URL to the OpenVox base URL ending in /v1. Use Fetch to select a model, then a language, then a voice. Open a Markdown note and run Read current note aloud.
What API URL should I use in Narrate?
Use the base URL shown by OpenVox, such as http://127.0.0.1:8000/v1. If OpenVox runs on port 8001, use http://127.0.0.1:8001/v1. Narrate appends the speech and discovery routes itself, so do not enter the full /audio/speech endpoint.
Does Narrate require an OpenAI API key?
No OpenAI API key is needed for this local OpenVox workflow. OpenAI-compatible describes the API format. Narrate sends speech requests to the OpenVox server configured in its API URL field.
Can I use Narrate on Obsidian mobile?
Narrate is currently desktop-only according to its plugin manifest. Run this integration in desktop Obsidian. You can export a note as WAV on the desktop and transfer the file to a phone for playback.
Can Obsidian read notes in a cloned voice?
Yes, when a compatible saved voice is exposed by OpenVox for the selected model and language. Create the voice in OpenVox, then fetch the voice list in Narrate and choose its returned identifier. Only clone a voice you own or have permission to use.
Is this Obsidian text-to-speech setup unlimited?
Narrate does not remove OpenVox’s plan limits. OpenVox Free has a daily generation allowance; OpenVox Pro enables unlimited generation on the purchased platform. Local generation avoids per-request cloud speech charges, while speed and capacity still depend on your computer.
Start with a note you already know
Choose a short draft or familiar study note, connect Narrate to OpenVox, and listen once with a ready-made voice. When pronunciation and playback feel right, try longer notes, a saved clone, or a WAV export. Your existing Obsidian writing becomes a reusable listening library.
OpenVox Free includes a daily generation allowance; Pro removes that limit on the purchased platform. See current pricing before planning a large audio vault.
Published October 4, 2026. Screenshots show Obsidian 1.13.7 and Narrate 0.3.0 on Mac. Setup details were checked against the supplied screenshots and Narrate’s documentation. Narrate is a third-party plugin maintained independently of OpenVox; settings can vary by version.